Page 5 of 18
Re: saDgit's flat-faced pop-top
Posted: April 26th, 2015, 7:49 am
by saDgit
Morning Clive, thanks for the encouraging words.
No, I think I've done all I'm going to with the ali panels. Having ummed and aarghed for a long time about the outer skin, I've finally decided to go the high maintenance route - yacht varnish on 3mm ply - except for the roof where the ply will be finished with polyester resin and glassfibre. As far as I know (and believe me that ain't very far!) the epoxy sealant can be overpainted as long as it's only been used as a sealant, i.e. quite heavily diluted and only one or two coats. Any more than that and the resin starts to sit on the surface rather than soaking in and at that point I think there may be problems overpainting - I believe epoxy can be fussy about what goes over it. There's masses of stuff on the web about epoxy and what it will and won't do but I'm afraid much of it goes over my head. What I have found and understood is that it can be used under yacht varnish in order to reduce the number of coats required for a high gloss finish - traditionally it used to be as many as 12! So I'm hoping to get away with 3 or 4 coats of diluted epoxy under 4 coats of varnish. I hope I'm right!

Re: saDgit's flat-faced pop-top
Posted: April 26th, 2015, 2:14 pm
by saDgit
Well, I still haven't sorted out all the uncertainties with the roof that I described in my previous post but I figure life's too short to wait for all the answers, so today I cracked on with the elevating clam-shell.
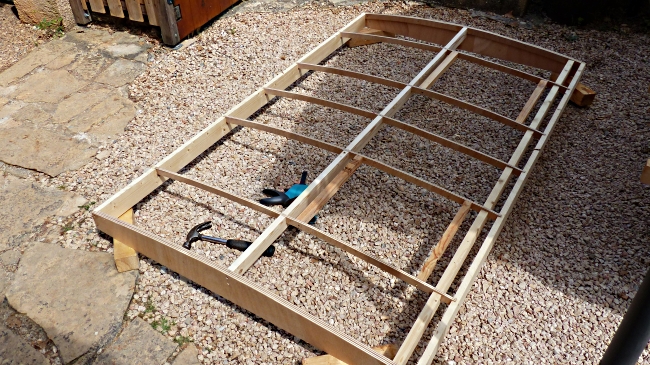
Once again it looks remarkably like the SketchUp drawing so I'm pleased enough with that. The two square 'holes' in the framework are for roof vents.
Re: saDgit's flat-faced pop-top
Posted: April 26th, 2015, 3:00 pm
by zildjian
And to achieve that only with Le marteau to hand I feel is an accomplishment in itself

The interior must be getting ever closer what inspiration do you have for that vital part Martin
Re: saDgit's flat-faced pop-top
Posted: April 26th, 2015, 5:40 pm
by saDgit
Hah, fooled you! I just left the hammer lying there do give the impression of craftsmanship. I've actually built it all with a chainsaw and a breadknife.

Re: saDgit's flat-faced pop-top
Posted: May 1st, 2015, 1:10 pm
by saDgit
I'm a bit stuck at the moment, waiting for delivery of the 3mm ply with which I'm going to skin the camper, and really that's the job that needs to be done next. I ordered it (and paid for it!) back on the 19th of April so I'm hoping it's going to be here soon but who knows? May is a big month for public holidays here in France (as many as four of them sometimes) so predicting when stuff might happen is a bit of a mug's game. So, in the meantime, all I've been able to do is to make and fit the aluminium frames around the side access hatches and to bolt in the stainless tie-down rings that I bought some weeks ago.
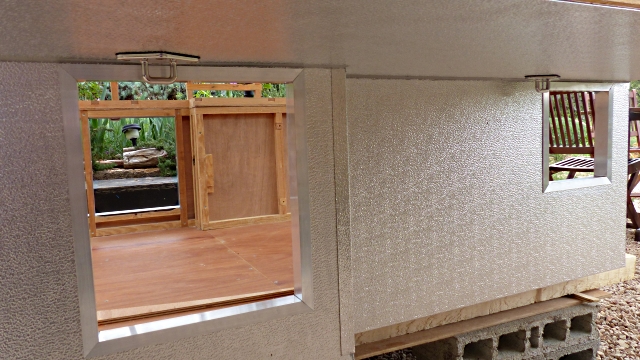
They were hardly pressing jobs but it's another small step forward.
Re: saDgit's flat-faced pop-top
Posted: May 3rd, 2015, 7:12 pm
by zildjian
Martin, while its quiet, could you add a picture of the reverse of those steel loops on the interior
I'm guessing they have a big steel plate on the reverse
ta
Re: saDgit's flat-faced pop-top
Posted: May 3rd, 2015, 9:52 pm
by Phoenixsp1
Just wondered how you plan to seal the access hatches Martin, is that angle around the holes or U channel? I need to do something similar on the chequerplate panels that I've put on the suntrekker, so interested in how you plan to do this. Are the access panels going to be hinged?
Re: saDgit's flat-faced pop-top
Posted: May 4th, 2015, 8:08 am
by saDgit
zildjian wrote:Martin, while its quiet, could you add a picture of the reverse of those steel loops on the interior
I'm guessing they have a big steel plate on the reverse
ta
Yeah, though not too big. Worked out the size using the well-known formula:
size = what have I got lying around in the shed /4. Turned out to be about 100mm x 100mm x 2.5mm.
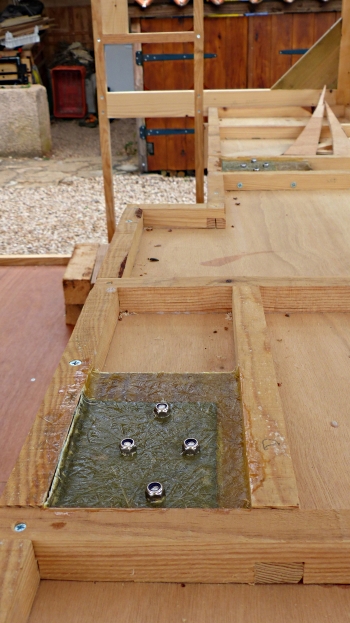
The solid wooden block is glued and bolted into the framework and then the steel plate is fixed on top of that. The layer of glassfibre and resin over the top was just to hold the steel in place until the tie-down loops were bolted in. It all sits within the 30mm width of the wall of course so there are no thermal bridges to the inside. I figure they'll cope easily with the bumps, bounces and bangs of normal motoring but if someone drives into the side of us again something will have to give.

Re: saDgit's flat-faced pop-top
Posted: May 4th, 2015, 8:27 am
by saDgit
Phoenixsp1 wrote:Just wondered how you plan to seal the access hatches Martin, is that angle around the holes or U channel? I need to do something similar on the chequerplate panels that I've put on the suntrekker, so interested in how you plan to do this. Are the access panels going to be hinged?
Hi Clive, The alu is just angle not U channel - I'm trying to avoid any metalwork going unbroken from the outside of the camper to the inside. Thermal bridges like that just mean condensation and wet metal on cold mornings. The access panels are all hinged - for the two big ones at the back I'm pinching the idea from S.Karosser campers and using Thetford cassette access doors inside out (they're really designed to open outwards of course so do need to be sealed carefully but inside the pickup bed, as mine will be, that's not really a big issue). They're good because they look neat inside the camper and are big enough to be able to use the otherwise wasted space between the camper and pickup wall. The front hatches are smaller but I've found a couple of slightly less elegant, hinged door panels through Amazon that I can insulate and finish to match the others.
Re: saDgit's flat-faced pop-top
Posted: May 4th, 2015, 6:13 pm
by Phoenixsp1
It sounds like you have the right idea regarding the cold bridges Martin. I don't suppose you have a link to the hatches on Amazon? You might also want to look at plastic boat hatches, I got one off eBay with locks for about £30. It's not really big enough for what I need unfortunately but I'll find a use for it when I construct the cargo box for my syncro.